Tutorial will show how to build android widget with one button and image. Button press will change the image displayed. The result will look as follows

Source code
Hereby I share my widget on github. Feel free to download.
1. Create widget layout
layout is defined as any other layout in Android app. My layout consists of just one button and one imageView (/res/layout/widget_demo.xml).
<?xml version="1.0" encoding="utf-8"?>
<LinearLayout xmlns:android="http://schemas.android.com/apk/res/android"
    android:layout_width="fill_parent"
    android:layout_height="wrap_content"
    android:orientation="vertical"
    android:layout_margin="5sp"
    android:background="@android:drawable/alert_dark_frame" >

    <ImageView
        android:id="@+id/widget_image"
        android:layout_width="110sp"
        android:layout_height="110sp"
        android:layout_gravity="center"
        android:src="@drawable/wordpress_icon" />

    <Button
        android:id="@+id/widget_button"
        android:layout_width="wrap_content"
        android:layout_height="wrap_content"
        android:layout_gravity="center"
        android:text="Change it!" />

</LinearLayout>
Please remember that views that can be used in widget layout are limited. It depends on android version you are developing for. Find out more here. Make sure that view that you are using is supported by target android SDK version.
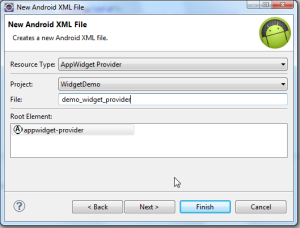
2. Create App Widget Provider declaration
This is another xml file that tells android OS that this application has a widget (display your widget in OS widget list). Create it with wizard:
File → New → Android → Android XML File
Widget size should be defined in dp. Usually widget size is related to one icon size on desktop (74 x 74 dp). Size should be mutiplication of such blocks. It may be calculated using formula:
((Number of columns or rows)* 74)
Please remember however to leave some space for margins. My widget has width and height equal to two icon blocks (146 dp x 146 dp):
<?xml version="1.0" encoding="utf-8"?>
<appwidget-provider xmlns:android="http://schemas.android.com/apk/res/android"
    android:initialLayout="@layout/widget_demo"
    android:minHeight="146dp"
    android:minWidth="146dp"
    android:updatePeriodMillis="1000000"
    >
</appwidget-provider>
3. Create AppWidgetProvider onUpdate implementation
Create class extending AppWidgetProvider. It will be responsible for updating your widget while Android OS requests it (e.g. widget is shown to user).
Here you have to set button listener (as a PendingIntent, because RemoteViews supports only that way of communication)
public class MyWidgetProvider extends AppWidgetProvider {

	@Override
	public void onUpdate(Context context, AppWidgetManager appWidgetManager,
			int[] appWidgetIds) {

		RemoteViews remoteViews = new RemoteViews(context.getPackageName(), R.layout.widget_demo);
		remoteViews.setOnClickPendingIntent(R.id.widget_button, buildButtonPendingIntent(context));

		pushWidgetUpdate(context, remoteViews);
	}

	public static PendingIntent buildButtonPendingIntent(Context context) {
		Intent intent = new Intent();
	    intent.setAction("pl.looksok.intent.action.CHANGE_PICTURE");
	    return PendingIntent.getBroadcast(context, 0, intent, PendingIntent.FLAG_UPDATE_CURRENT);
	}

	public static void pushWidgetUpdate(Context context, RemoteViews remoteViews) {
		ComponentName myWidget = new ComponentName(context, MyWidgetProvider.class);
	    AppWidgetManager manager = AppWidgetManager.getInstance(context);
	    manager.updateAppWidget(myWidget, remoteViews);
	}
}
In buildButtonPendingIntent I set that after widget button press the intent will be sent. So now… it is time to catch that intent in Broadcast Receiver and handle widget update
4. Register MyWidgetProvider in AndroidManifest.xml
Add these lines in <application/> tag:
        <receiver android:name="MyWidgetProvider" >
            <intent-filter >
                <action
                    android:name="android.appwidget.action.APPWIDGET_UPDATE" />
            </intent-filter>

            <meta-data
                android:name="android.appwidget.provider"
                android:resource="@xml/demo_widget_provider" />
        </receiver>
5. Create Broadcast Intent receiver
This will be called for pending intents updates. Widgets are built on RemoteViews (views that are managed by another process than your application). This is why they communicate with your app by PendingIntents.
public class MyWidgetIntentReceiver extends BroadcastReceiver {

	private static int clickCount = 0;

	@Override
	public void onReceive(Context context, Intent intent) {
		if(intent.getAction().equals("pl.looksok.intent.action.CHANGE_PICTURE")){
			updateWidgetPictureAndButtonListener(context);
		}
	}

	private void updateWidgetPictureAndButtonListener(Context context) {
		RemoteViews remoteViews = new RemoteViews(context.getPackageName(), R.layout.widget_demo);
		remoteViews.setImageViewResource(R.id.widget_image, getImageToSet());

		//REMEMBER TO ALWAYS REFRESH YOUR BUTTON CLICK LISTENERS!!!
		remoteViews.setOnClickPendingIntent(R.id.widget_button, MyWidgetProvider.buildButtonPendingIntent(context));

		MyWidgetProvider.pushWidgetUpdate(context.getApplicationContext(), remoteViews);
	}

	private int getImageToSet() {
		clickCount++;
		return clickCount % 2 == 0 ? R.drawable.me : R.drawable.wordpress_icon;
	}
}
WARNING!!!
Since you are creating RemoteViews from scratch in Broadcast Receiver (using constructor with new keyword), you must refresh widget layout from scratch. Mainly: refresh the button listeners pending intents. This will help you to avoid issues like this and that.
6. Register Broadcast Receiver in AndroidManifest.xml
Add the following lines in <application/> tag:
<receiver
    android:name="MyWidgetIntentReceiver"
    android:label="widgetBroadcastReceiver" >
    <intent-filter>
        <action android:name="pl.looksok.intent.action.CHANGE_PICTURE" />
    </intent-filter>

    <meta-data
        android:name="android.appwidget.provider"
        android:resource="@xml/demo_widget_provider" />
</receiver>
7. That’s all!
Hereby I share my widget on github. Feel free to download. Feel free to customize widget according to your needs!
Here you will find some another widget tutorial. Maybe it will also be useful for you.

This tutorial was really helpful in understanding Widgets
return clickCount % 1 == 0 ? R.drawable.me : R.drawable.wordpress_icon;
how do I extend the code for multiple images?
Put drawables in an ArrayList and after button click get the drawable corresponding to clickCount
Remember to reset counter if it reaches ArrayList’s size to avoid IndexOutOfBounds exception
I am in android still beginner. how would the code look like,
do you have a code example for me?
This is pure Java, not android
I can post you source code, however these are real basics. I am on a trip right now so you would have to wait few days. Let me know if you are still interested
Hi, I am interested on how to implement this. Can you post the source code?
Explain me your problem
I have total of 12 images. Same as e-l, I have limited Android development knowledge. Hope you can post the code example.
Forgive me but these are real java basics. Simply google for iterating and handling Lists items in Java
I seriously have no idea on the arraylist. So I’m using a stupid method.
clickCount++;
if (clickCount == 1) {
return R.drawable.image1 ;
}
if (clickCount == 2) {
return R.drawable.image2 ;
}
if (clickCount == 3) {
return R.drawable.image3 ;
}
It is working. But how should I reset the counter? Let say the clickCount should be rest to 0 when clickCount == 3 . Hope you can at least show me how to reset it. Thank you.
It’s ok, problem solved. I added this at the bottom.
clickCount = 0;
return R.drawable.image1 ;
I have a last question. How to open the app MainActivity when onclick on the image?
Problem solved by adding this under onUpdate
context.startService(new Intent(context, MainActivity.class));
Intent intent = new Intent(context, MainActivity.class);
PendingIntent pendingIntent = PendingIntent.getActivity(context, 0, intent, 0);
remoteViews.setOnClickPendingIntent(R.id.widget_image, pendingIntent);
However, I noticed a problem. After I restart my phone, the button click is not working.
I know the cause of the problem. The reason is because the widget still have not finish loading on reboot. There is a same problem posted at stackoverflow but no one reply
http://stackoverflow.com/questions/27891483/how-can-i-update-my-android-widget-faster-on-reboot
Do you know how to solve this or how to show the loading message before the widget finish loading?
I managed to show the loading message, at least is a temporary fix for the above bug. However, after that I noticed another bug. The intent for widget_button is not working after the phone went to sleep for longer period of time. I tried to post a question at stackoverflow but no one reply.
http://stackoverflow.com/questions/29468369/android-widget-button-onclickpendingintent-not-working-after-sleep
this tutorial is helpfull for me, can u help me for same task with two button click event, i.e. i want to handle two button click event on widget….
Just try to duplicate instructions that aims to do the first button.
Creating the second button is similar to the first one (remember to create second PendingIntent, and handle it separately for the second button)
thanks…friend
hi im trying to create widget my widget working fine on android 2.2 but its not listed on android 4.0 + version what should i do ?
u can see my codes here
http://stackoverflow.com/questions/16757813/widget-not-shown-on-android-4-xx-jellybean
I guess in MyWidgetIntentReceiver you should change
private int getImageToSet()…
to …. return clickCount % 2 == 0
right! sorry :)
Hey Jacek..iIts really awesome..Now instead of updating drawables, I am flipping certain text views. I have 3 text views with different text and now I want to flip among them. I think I have to change the visibility for them.Please guide how to access these .xml properties in .java file. In widgets, there is no findViewById..Please guide..
It would be better for you to change TextView content instead of changing TextView itself. This answer on StackOverflow will help you:
http://stackoverflow.com/questions/12688566/how-to-set-text-on-a-widgets-textview
So basically, when ou are re-creating your RemoteViews on widget, you can call a method on TextView:
remoteViews.setTextViewText(R.id.widget_textview, text);
and that’s it!
ok..thanks..:-)..it worked.
Another Question: How does a widget interacts with the main application. Like if I want to access some feature(method/functionality) of the app into the widget so do I need to recreate all the functionality or can I reuse them from there? Please please guide.
Sure, you can do what you want in BroadcastReceiver. There you have context as well, so you can wake up your app
Can I have a sample of it ? Any of your code or some other link will be if great help.. Thanks..
Sample is in this tutorial. You should figure out what best suits your need based on that.
I am not sure what you want to achieve
Okay so my application has one feature of tracking your location and getting all nearby places in the list view displayed. Now I want that part in a widget, i.e as per my location, show me the nearby places. So for this, do I need to make all the service and network calls again or can I just call those methods that implement this thing in my application-controllers?
now I get it. Widget is not a solution for you. widget may act only as an location data display view. But it is definetely bad idea for performing some periodic operations.
If you want to have periodic location updates you can use one of these two components:
– Service: it is runnning in background and can perform any kind of operations (including location and widget state updates). Read more here: http://www.vogella.com/articles/AndroidServices/article.html
– Alarm: if you do not need permanent state control in service, but just short periodic peaks you can set up a recurring Alarm that you will handle for instance by: 1. check the location, 2. update widget status. 3. that’s all :). Alarm also sends an intent when it is fired. you have to catch it in BroadcastReceiver (probably not the same one as for widget). see alarm implementation here: http://www.vogella.com/articles/AndroidBroadcastReceiver/article.html
I think that that’s all you need, and since it is not in scope of this article I suppose that now you’ should follow links I’ve provided you
Tnx a lot man . . . ive been searching for hours to find a basic widget tutorial . . . :)
Thanks….
Thanks a ton
Thanks man.
Thank for providing widget’s source code it is really helping. I read this as my first tutorial to learn android widgets.
this is the error how to fix it
ActivityManager: Error: Activity class {com.chaturvedi.widget_demo/com.chaturvedi.widget_demo.MainActivity} does not exist.
Ensure you have such class declared in manifest with exact the same package
i hav that package with same spelling thank you
i have logcat error like this can you help to fix it sir
: E/(): Device disconnected: 1
hello sir this is not working in emmulator but work in phones
that was the problem
thank u for the tutorial and replies and guidence
hello everybody!, how can I create widgets to my app? I mean I created it before and I just want to create its link. My app just has an imagebutton and I want to activate its clic. Thank you so much.
combine manifest file and just copy the java files and create same wdget provider xml file also
how to update widget every minute
See android timer post on my blog how to fire periodic actions. that action should refresh your widget
Hmm is anyone else experiencing problems with the
pictures on this blog loading? I’m trying to determine if its a problem on my end or if it’s the blog.
Any feed-back would be greatly appreciated.
I suppose it is the problem on your side…
Thanks for your great tutorial. Saved my day.
I get error.. “default activity not found” .. It says this. It works but when I press on button nothing changes.
Step 5 gone wrong.. me weak in java. and generally what all import libraries in main_activity.java
Hi Jacek,
If I create several widget on my apps,
this MyWidgetIntentReceiver onReceive will only trigger on specific widget?
Your widget emits intent. If all of them emit same intent you can handle it in one receiver.
You can emit various intents otherwise
Great Tutorial man, Thanks alot…. Helped me :) :)
I recommend to look at this open source library of awesome audio widget: https://github.com/Cleveroad/MusicBobber.
I do all that you explain… but when i click the button, nothing happens.
Can anyone help me?
thanks you!
Thanks for giving LINK of source code. Most people are give just teaching how to code but not giving actual code.
Thanks again.